


Monday, May 25, 2009
The Digital Wall Project: An Epic Tale
Posted by Jason Dunn in "Digital Home Talk" @ 07:00 AM
Stage 5: The Carpenter Does His Thing
As I mentioned earlier, the carpenter we hired was a family friend, and as a master carpenter we felt he had the skills to pull off the shelves we wanted. In the weeks leading up to this project, we met with him twice and we sent emails back and forth - he came up with a design, we modified it a bit to make room for the speakers, and we came to an agreement on the final design. We were excited to see the final design, and paid him a deposit up front.

Figure 14: Look at the size of that shelving unit. Wow!
When the shelves arrived and were being installed, at first glance they looked fantastic - exactly what we had envisioned. The carpenter did a great job of securing all the pieces together, making it look like one continuous flow of wood - and they were designed to hang on the wall without visible support above or below. When the shelves were being attached to the wall, the carpenter informed me that he couldn't mount the left-hand shelving unit at the height we requested - which matched the shelving unit on the right - because the electrician had mounted the Vacuflo panel 1.5 inches higher than it was supposed to be. Not having any other choice (the right shelving unit was already up), I authorized him to mount the left shelving unit at the necessary height. Professional fail #4. Thankfully, it's not noticeable - but it's irritating to know that the electrician decided to get "inventive" with yet another of my measurements.
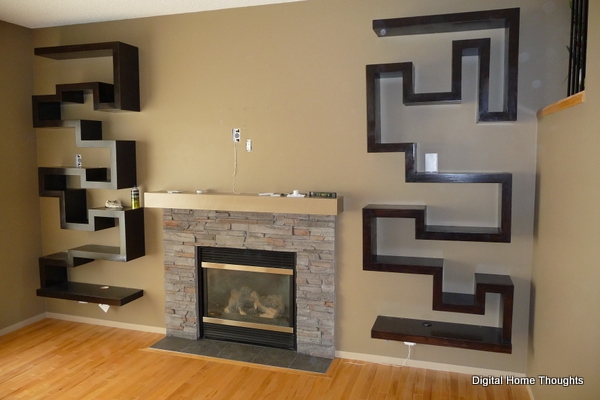
Figure 15: They look good, right? Well...
I didn't look closely at the shelves while they were being installed because I didn't want to get in the way. Once the shelves were up, I took a closer look at them, and grew a bit concerned. The finish was supposed to match our coffee table - a very dark brown. I knew it wouldn't be a perfect match, but an approximation would be good enough. The colour wasn't the problem - the lack of a uniform finish was. In dozens of spots all over the shelves, all in very visible locations, the finish wasn't even. This wasn't a nice woodgrain showing through, it was the finish lifting and getting smeared. I know nothing about finishing wood, but I didn't think that was normal.
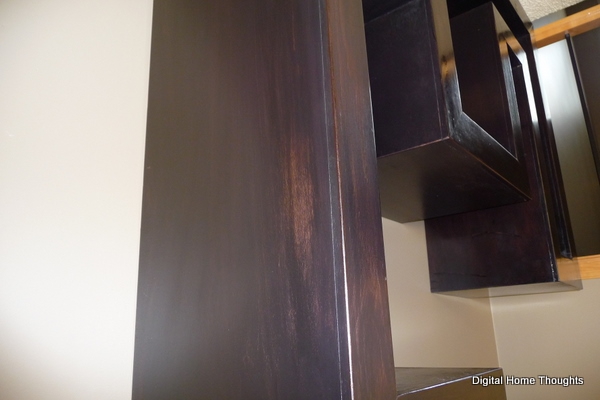
Figure 16: One of the man spots where the finish was uneven.
Equally noticeable was that the shelving unit on the right wasn't mounted straight. The entire middle section was tilted upward, and quite obviously so - the whole thing was torqued clockwise, likely from the pressure the design was exerting upon itself. In fact, in the upper portion of the left shelf, the narrow vertical portion wasn't evenly spaced from top to bottom. There were also numerous spots on both shelves where the nails were popping up slightly, and knots in the wood that were improperly filled. So from ten feet away the crooked shelf was obvious, and up close the flawed fit and finish was obvious. Professional fail #5.
The carpenter came back and said that we were "eagle-eyed" for noticing the crooked shelf and insisted it wouldn't be obvious to anyone else. When my friend Matt saw the shelves for the first time he asked if we knew one was crooked. We even bought a new level in case our old one was dysfunctional. The carpenter came back again to discuss the finish, and he explained that he had never stained anything that dark before, and the store he bought the stain from had told him that doing a brown stain first, followed by a black stain, was the right approach. They also told him that the sealing top coat he used was compatible with the stains he used - it wasn't, because as he sealed it, the stain was being lifted. He admitted to us that he wasn't happy with the finish, but he didn't know what to do about it. From our point of view, we were paying him for the product, not the store that sold him the stains, so we held him responsible for delivering an acceptable product.
After a month of discussions and negotiations, we informed the carpenter that he would not be receiving the remainder of his payment for the shelves until they were mounted on the wall straight, and the finish was improved. We called in my father in-law, who also happens to have experience working with wood. In the end the only realistic solution for us was for him to paint the shelves black. We'd lose the look of the wood grain, but the stain was so dark you had to be six inches away to see the wood grain anyway. To the credit of the carpenter, he covered the cost of hiring my father in-law to paint the shelves, and in the end they looked quite good painted a semi-gloss black.
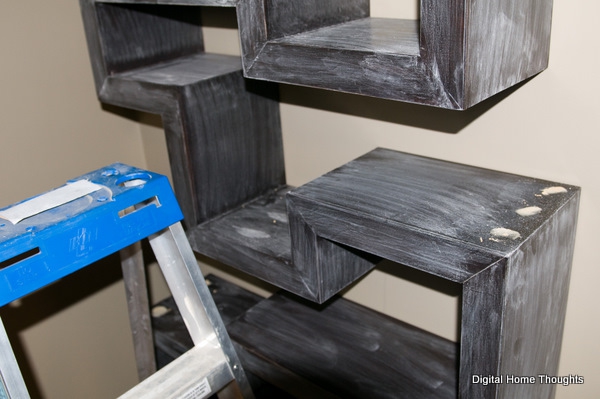
Figure 17: Before the shelves could be painted, the finish had to be roughed up with sand paper (so the pain would absorb) and the various nail pops and wood knots had to be filled and sanded.
Once the shelves were painted, it was time to implement the technology elements.


