


Friday, February 12, 2010
DxO Optics Pro 6 Elite Reviewed
Posted by Matthew Shanks in "Digital Home Software" @ 07:00 AM
Customization
Once users have added their photos to a project, they move on to the Customize tab. In this tab, users can choose to accept the previously chosen preset and move on to the Process tab, or start to utilize the impressive number of correction tools available. The tools within Optics Pro 6 are shown in the workspace as pre-defined groups (My First Steps, DxO Essentials, or Advanced User), which show only certain toolsets, or palettes, as DxO references them. Each group can be fully customized, allowing the user to choose what palettes they would like to see on screen, as well as docking the palettes to the left or right side of the screen, or allowing them to float.
The available palettes include Light, Colour, Geometry, Detail, Tools, Move/Zoom, Histogram, EXIF, and a Preset Editor. Each palette has numerous corrections within it, such as exposure compensation, vignetting, multi-point colour balance, distortion, keystoning/horizon, noise, dust, and chromatic aberration.
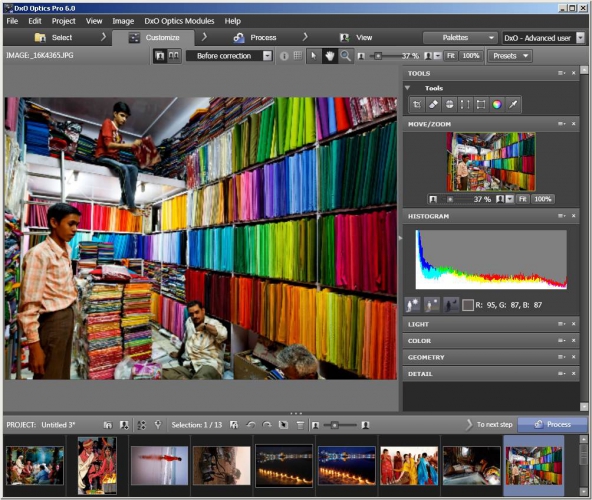
Figure 2: Customize Tab
The workspace allows you to preview your images before and after correction. When comparing an original RAW image in Lightroom to the "Before Correction" image in DxO, I found that DxO often shows images as darker and grainer than the original, when using the DxO default processing preset. This is likely due to differences in the RAW convertors of each program, and will not be noticeable to anyone not doing a direct comparison with another image viewing program. The program cycles between the uncorrected and corrected images after the image is first selected from the project pane, and the user can manually adjust the zoom and select the arrow button to click and compare the two images. The hand button or the Move/Zoom palette can be used to move the zoomed area around within the image. I found that when I didn't have the Move/Zoom palette active and wanted to preview the effects of the processing in various areas of a photo, this clicking back and forth between the arrow and hand buttons was time consuming. Allowing the user to click to compare the corrections in either the hand or arrow mode would be an improvement. The workspace is very well laid out, and the customization options of the palettes are user-friendly. The option to use the pre-defined palette groups is a good one, as it allows users to jump in immediately to process images without being buried beneath advanced palettes. As users gain familiarity and confidence with the program, they can progress through the groups to the Advanced User group.
In the main correction preview window, the program displays a warning that zoom levels below 75% inhibit previewing of chromatic aberration, DxO lens softness, noise correction and dust removal corrections. This may be a limitation of its previewing ability, but it prevents the user from seeing the overall effects of all corrections with the image at lower zoom levels, until the image has been processed completely. Future versions of the software will hopefully allow for these corrections to be previewed at lower zoom levels.
Shooting with my Nikon D70s and Nikon 18-200mm (27-300mm equivalent) DX VR lens allowed me to fully test the distortion correction. This lens has distortion issues throughout its range, which are especially noticeable with lines in architecture. The automatic distortion correction worked very well on the many images of buildings I processed. Use of wider angle or fisheye lenses would really benefit from the distortion correction tool, as Optics Pro 6 can straighten out circular fisheye distortion images automatically. Using this lens also means that I am limited when shooting indoors, and I often have to resort to shooting at my highest ISO (1600) to produce usable images. The software's noise reduction tool worked extremely well to automatically improve these high ISO shots, removing unwanted luminance noise (graininess that blurs detail) and chrominance (colour noise). DxO also advertises that Optics Pro 6 can essentially boost a camera's ISO level by shooting at EV-1 and then processing the image with EV+1. While this trick works, the user must remember that they shot the image with EV-1, as oddly enough, the EXIF data does not show the exposure compensation from the camera. I was not able to confirm if this was related to my camera or if it is a feature missing from the software, as my exposure compensation information was fully accessible in Lightroom when viewing my EXIF data. Of all the tools within Optics Pro 6, the noise reduction tool was my favorite, and one that users of older cameras such as mine will be able to immediately benefit from. Users of new high ISO digital cameras will be able to shoot in even more challenging low light situations with the knowledge that Optics Pro 6 can automatically correct their images.


